Friends and family that rock up to your house and, even before taking off their jacket, enquire about the wifi facilities. It is an odd – modern issue – that visitors expect that, just like a shopping mall or hotel, you’ll have free wifi available as part of the dinner arrangements.
Actually, I am not totally blameless in this regard so maybe I should just get on with the point of the article.
Having a wifi network (and by extension an internet feed) is just one of those things that comes with a home these days. The essentials are gas, water, wifi and electricity and then, just maybe, children. Not necessarily in that order.
But then people want to use your network and or your Mac when they are visiting or sleeping over and this can raise some administration concerns. Do you really want to enter the – complicated – wifi password everytime someone asks? Do you really want to give them access to your Mac – logged in as you – with all the potential for revealing secrets or deleting files?
I am guessing not, so the best answer is a guest account. But more on that later.
First, let us talk about the wifi guest account.
Now this is going to be a bit tricky because while all routers offer a guest wifi they all go about it in different ways. In my case I use an Apple Airport Extreme so I can show you how that works but your modem may be very different.
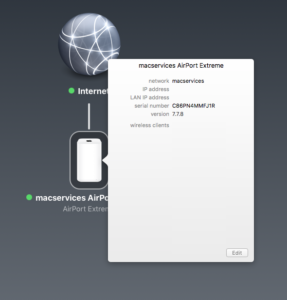
Open Airport Utility from the Utilities folder.
Click on your router and click on Edit
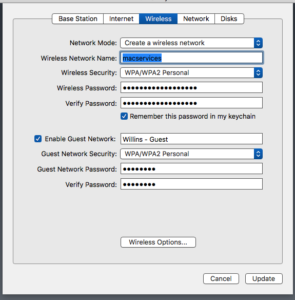
Click on Wireless tab and checkbox Enable Guest Network
Give the network a name and choose a password (something different from your own network)
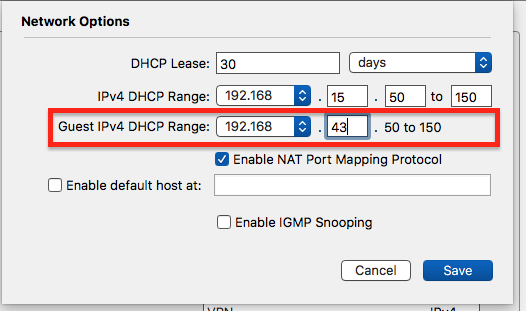
Then click on the Network tab and then Network Options…
Choose the range of your network and make it different to yours. In the example above you’ll see that my network is a range of 192.168.15.50 to 192.168.15.150 meaning that I can have 100 devices on my network in the 15 range. My guest network on the other hand is a 192.168.42.xxx network and that too can have a 100 devices.
Click Save and finally Update
I now have two networks and when a guest arrives, I tell them to choose the Willins-Guest network and furnish them with the password. A password that I can change at anytime without having to go around reconfiguring my TV, Stereo, iPad or laptop and a thousand other things.
Some other types of routers and their guides can be found in the list below…
Now we turn to your Mac.
You have a login and all your personal stuff is protected behind a password. And that is how it should be. But then a friend, or a family member, a grandchild perhaps, comes to visit and wants to hop onto your mac.
The answer is to set up the built in Guest account. Not only will this give them access to your mac – while protecting your files – but it will also mean that anything they download in the meantime will be deleted when they log out.
A privacy AND disk space saver all rolled into one.
Click on the Apple menu and choose System Preferences
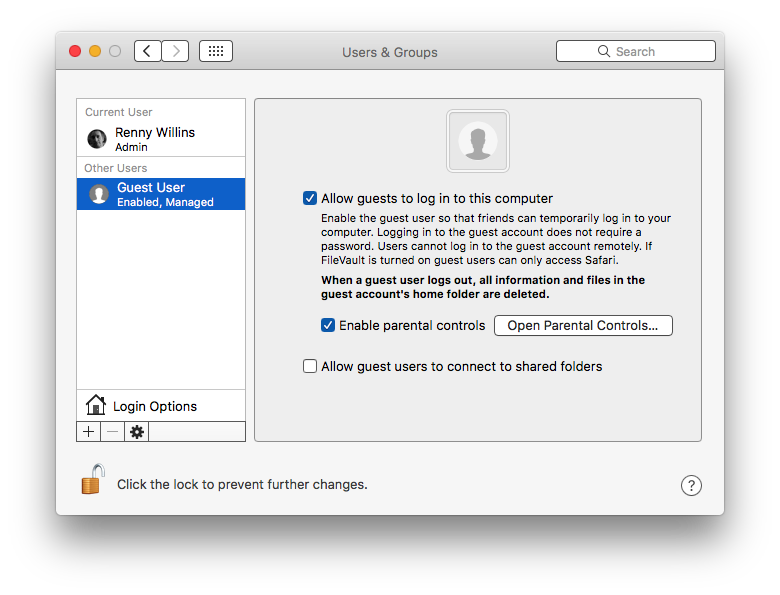
Click on User and Groups and click on the Padlock icon to unlock.
Click on Guest account and ensure that it is check boxed.
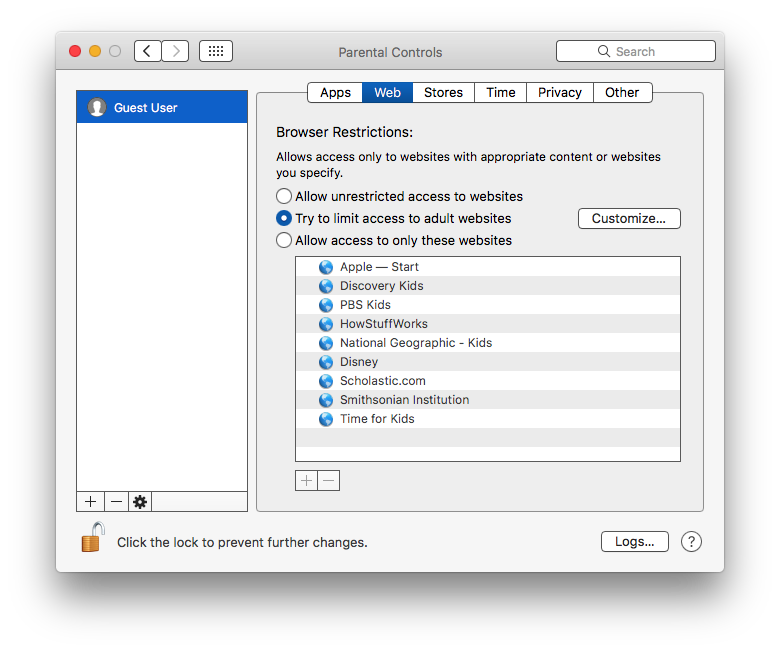
You’ll notice that there are a few options you can choose from before committing. The first is to Enable Parental Controls. This is particularly useful if your guest is a child. Once selected you can decide if they can use the web, google, chat, send emails and so on.
But be warned… this can be more trouble than it is worth, especially if you try and control web access at the micro level. I find the best option is to exclude adult websites and hope for the best.
Once set, close System Preferences and the next time you login you’ll notice a Guest account right next to yours.


Recent Comments